安全基础
数据加密模型
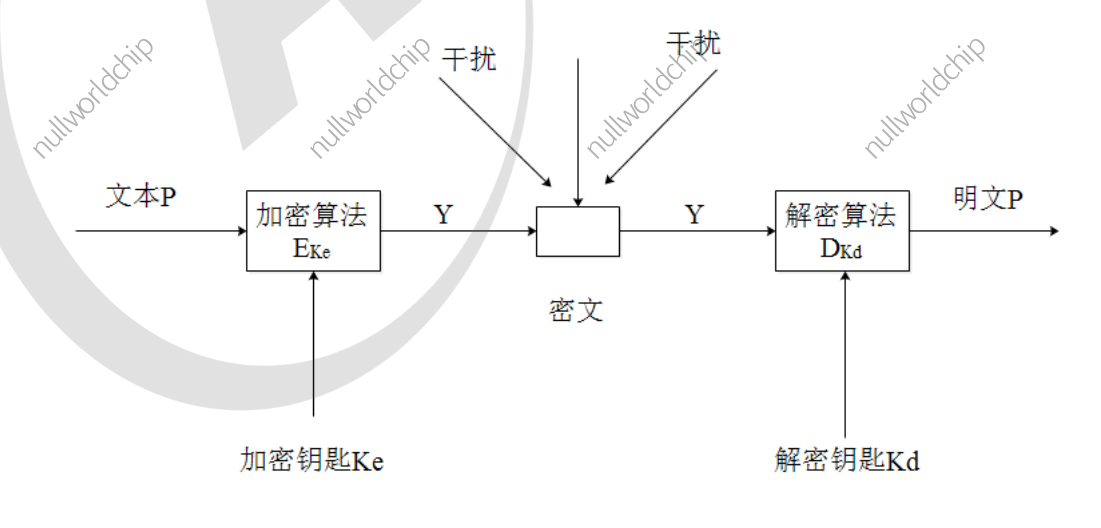
加密算法
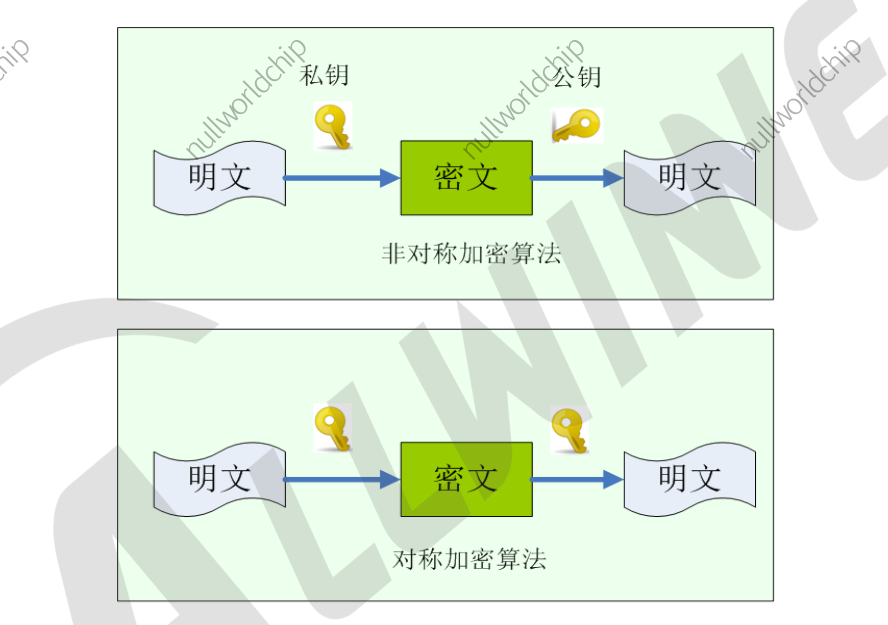
- 对称加密:只有一个密钥
- 非对称加密:公钥私钥对
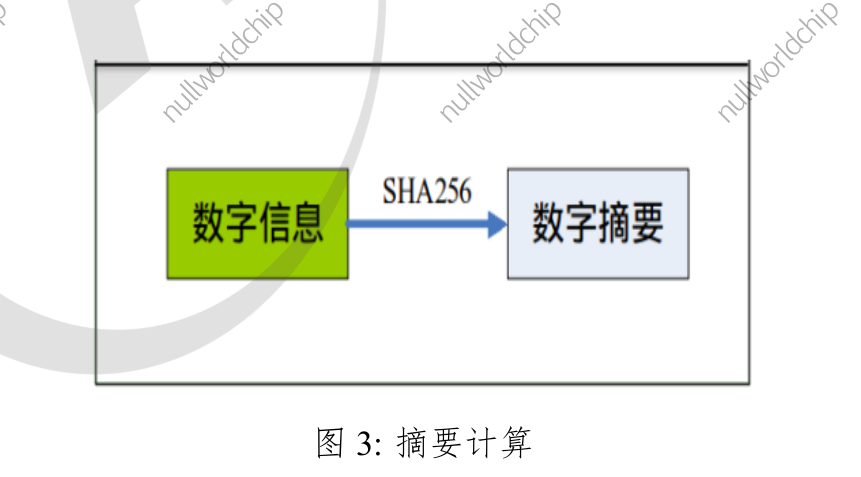
- 散列算法:一种摘要算法,把一笔任意长度的数据通过计算得到固定长度的输出,但不能通过这个输出得到原始计算的数据。
签名与证书
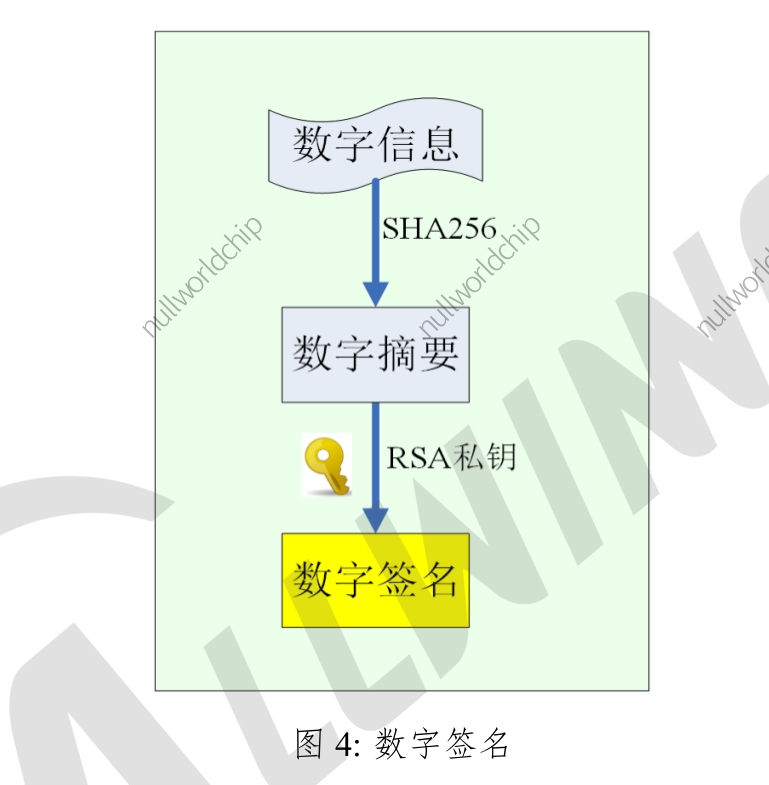
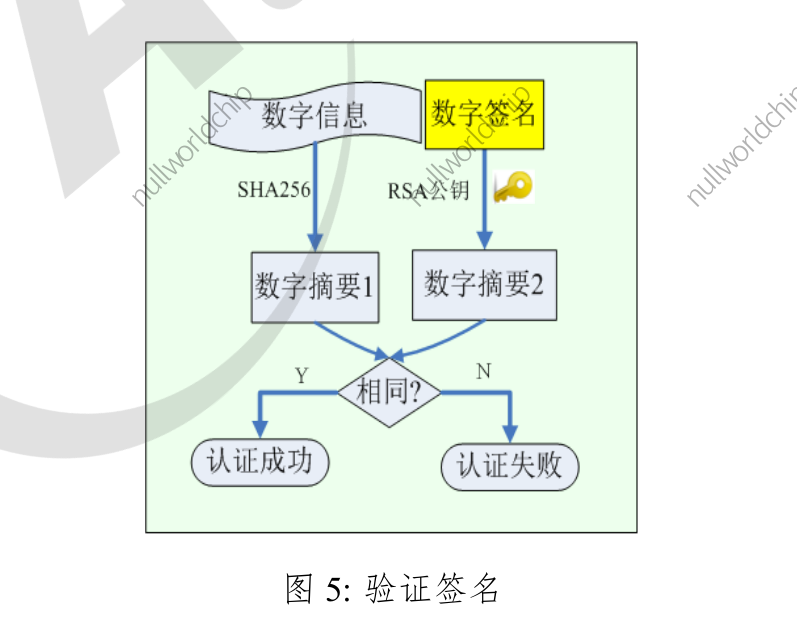
数字签名:数字签名是非对称密钥加密技术与数字摘要技术的应用。数字签名保证信息是由签名者自己签名发送的,签名者不能否认或难以否认;可保证信息自签发后到收到为止未曾作过任何修改,签发的文件是真实文件
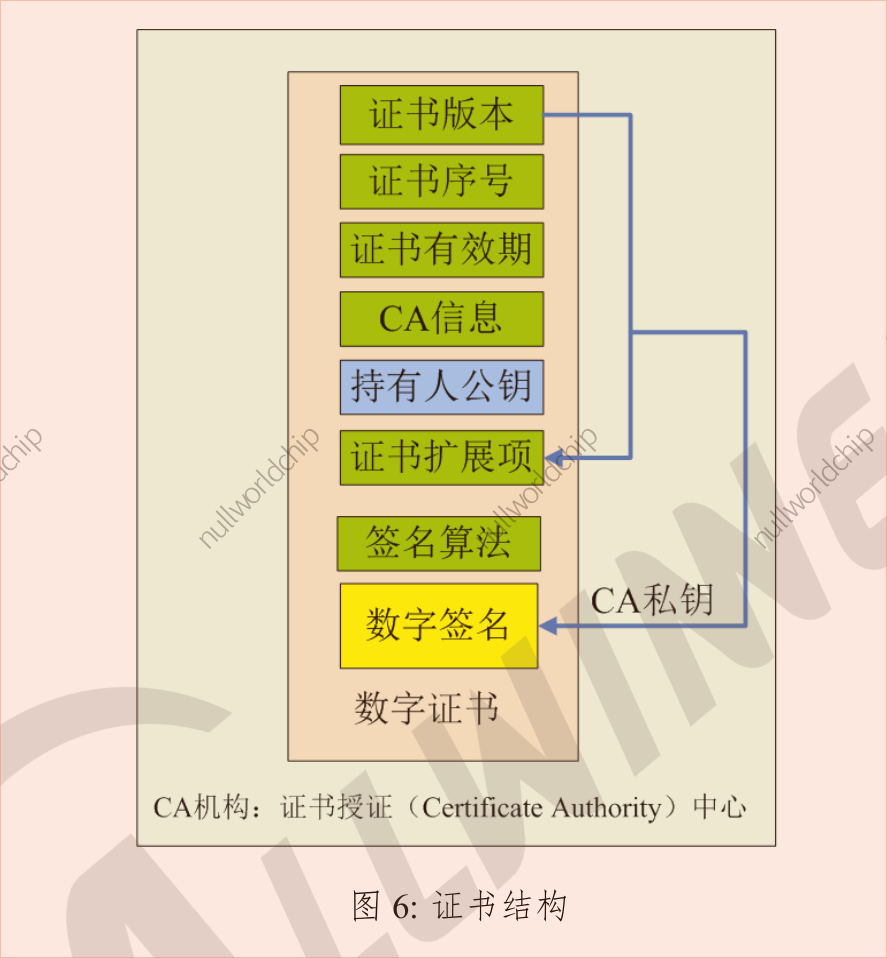
数字证书:是一个经证书授权中心数字签名的包含公开密钥拥有者信息以及公开密钥的文件, 是一种权威性的电子文档。
efuse
efuse:一次性可编程熔丝技术。有些 SoC 集成了一个 efuse 电编程熔丝作为 OTP(OneTime Programmable,一次性可编程)存储器。efuse 内部数据只能从 0 变成 1,不能从 1 变成 0,只能写入一次
TrustZone
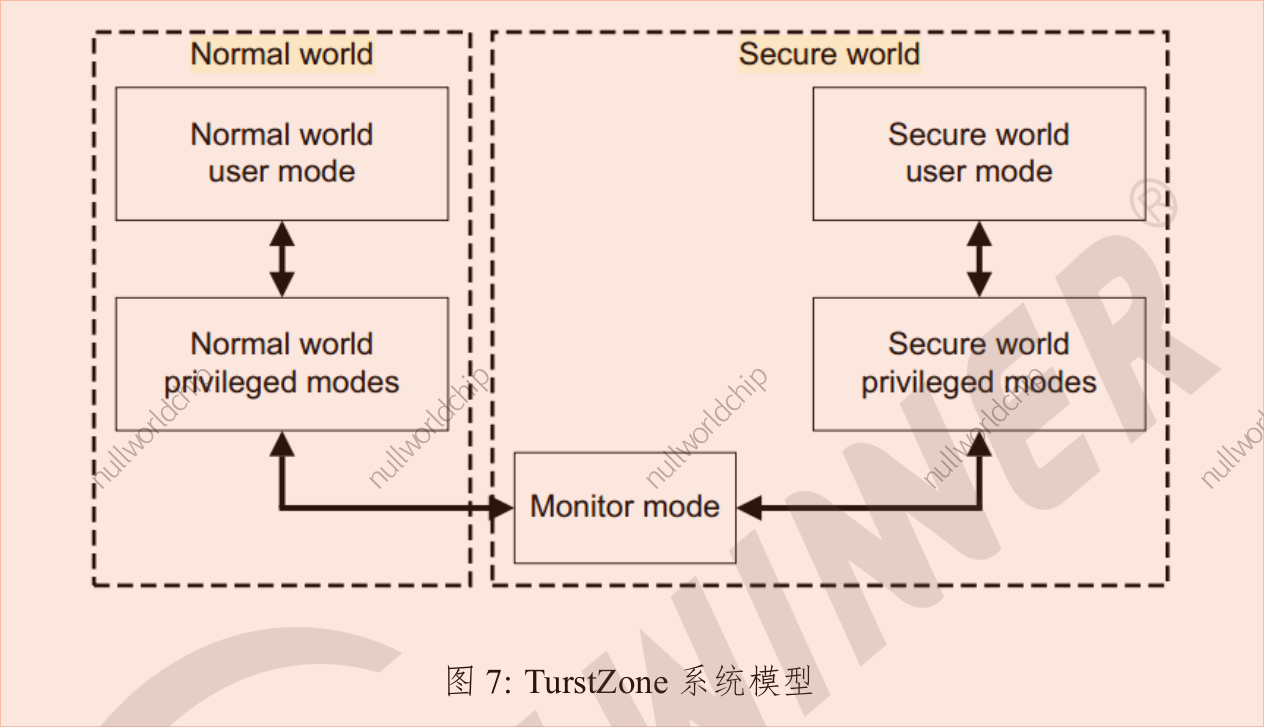
TrustZone 是 ARM 提出的安全解决方案,旨在提供独立的安全操作系统及硬件虚拟化技术,提供可信的执行环境(Trust Execution Environment)。TrustZone 系统模型如图 26 所示。
TrustZone 技术将软硬件资源隔离成两个环境, 分别为安全世界(Secure World)和非安全世界(Normal World),所有需要保密的操作在安全世界执行,其余操作在非安全世界执行,安全世界与非安全世界通过 monitor mode 来进行切换。具体可参考《TrustZone security whitepaper.pdf》。
OP-TEE
很多公司基于 TrustZone 推出了自己的安全操作系统,各自有各自的实现方式,但是基本都会遵循 GP(GlobalPlatform)标准。GlobalPlatform 是一个跨行业的国际标准组织,致力于开发、制定并发布安全芯片的技术标准,以促进多应用产业环境的管理及其安全、可互操作的业务部署。
OPTEE 是 Linaro 联合其他几个公司一起合作开发的基于 ARM TrustZone 技术实现的 TEE 方案, 遵循 GP 标准。
硬件安全模块
secure boot
基本原理
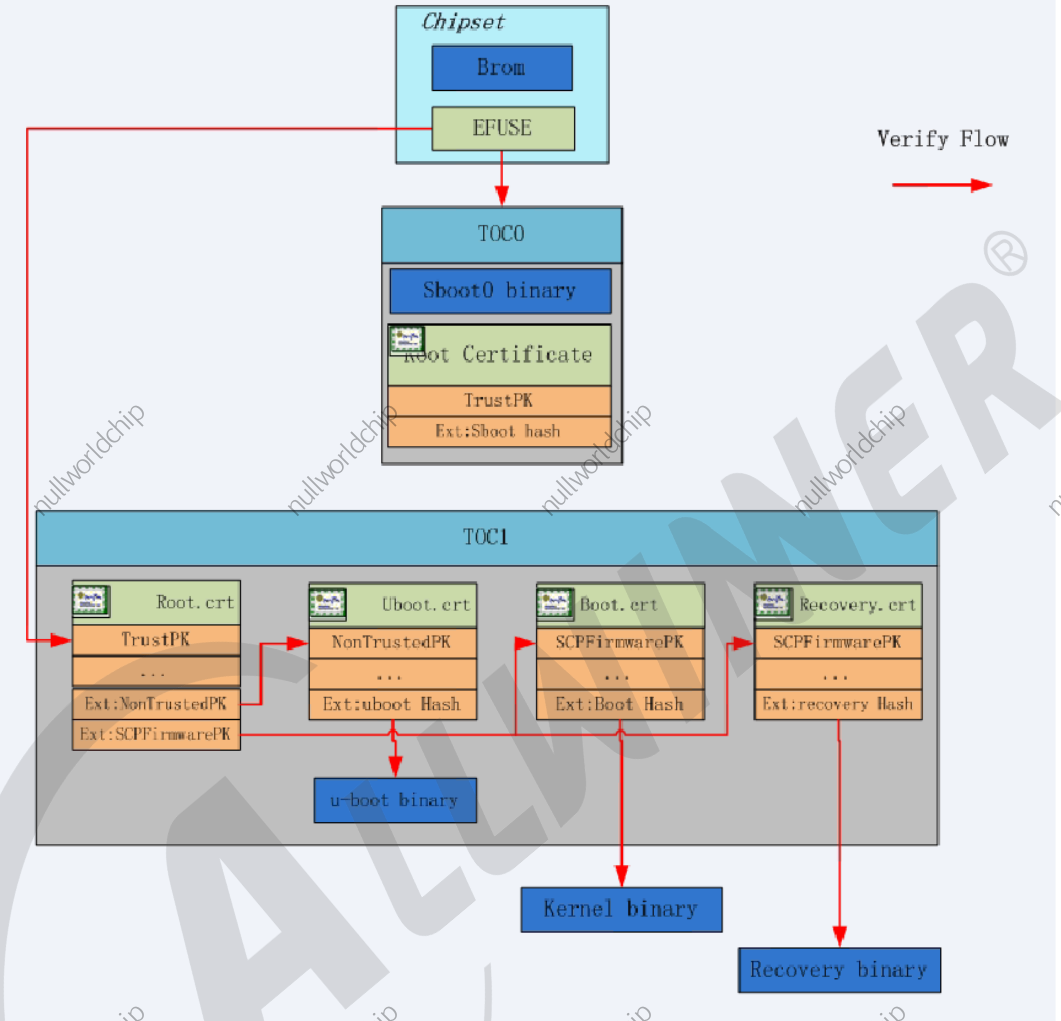
secure boot 启动过程中,芯片在启动时,会先对系统做安全性检验,检验通过后才引导系统。检查不通过则认为系统已经被修改,拒绝引导系统并进入烧录模式。安全性校验主要针对两个项目进行:
- 基于证书的哈希校验
固件中会包含证书,证书记录了固件的哈希值。芯片验证证书有效后,会使用证书记录的固件哈希值,和实际计算得到的固件哈希值对比,两者匹配则认为固件检验 OK。固件由多个子固件组成, brom>sboot>uboot>boot.img 的启动过程中,每个自固件都有对应的证书用于该子固件的哈希校验。确保整个方案的安全启动
固件中各子固件的具体验证流程如下:1. 使用 efuse 中的 rotpk 哈希验证证书记录的 rotpk 的有效性,2. 使用 rotpk 验证证书的有效性,3. 使用证书中记录的公钥验证子固件对应证书的有效性,4. 使用子固件对应证书记录的哈希值验证子固件的有效性。
防回滚版本号校验
芯片在引导固件的时候,会对比固件的版本号与芯片内存保留的版本号, 防回滚版本号在 lichee/tools/pack/chips/${chip}/configs/default/version_base.mk 中进行配置,文件中主要有两个属性可配置:
- ROOT_ROLLBACK_USED: 是否使能配置,1 为使能,此时 MAIN_VERSION 的值会用作安全固件的防回滚版本号。0 为不加入,此时无论 MAIN_VERSION 的值为多少,安全固件的防回滚版本号固定为0. 未配置此项时,按 ROOT_ROLLBACK_USED = 0 处理
- MAIN_VERSION: 固件的防回滚版本号,可用范围为 031。配置其他值芯片会直接认为固件版本号检验失败。
配置密钥
./createkeys
All valid Sunxi ic:
   0. a133
Please select a ic[a133]: 0
ready to create keys
/home/lxg/code/code/project/A133_android_10/longan/device/config/chips/a133
INFO: SELECT_IC is a133

INFO: creating new key

keypath=/home/lxg/code/code/project/A133_android_10/longan/out/a133/common/keys
create for RootKey_Level_0
Generating RSA private key, 2048 bit long modulus
e is 65537 (0x10001)
writing RSA key
create for NOTWORLD_KEY
Generating RSA private key, 2048 bit long modulus
e is 65537 (0x10001)
writing RSA key
create for PRIMARY_DEBUG_KEY
Generating RSA private key, 2048 bit long modulus
e is 65537 (0x10001)
writing RSA key
create for SCPFirmwareContentCertPK
Generating RSA private key, 2048 bit long modulus
e is 65537 (0x10001)
writing RSA key
create for SecondaryDebugCertPK
Generating RSA private key, 2048 bit long modulus
e is 65537 (0x10001)
writing RSA key
create for SoCFirmwareContentCert_KEY
Generating RSA private key, 2048 bit long modulus
e is 65537 (0x10001)
writing RSA key
create for TrustedFirmwareContentCertPK
Generating RSA private key, 2048 bit long modulus
e is 65537 (0x10001)
writing RSA key
create for TWORLD_KEY
Generating RSA private key, 2048 bit long modulus
e is 65537 (0x10001)
writing RSA key
create for NonTrustedFirmwareContentCertPK
Generating RSA private key, 2048 bit long modulus
e is 65537 (0x10001)
writing RSA key
all_toc0=item=toc0,		sboot.bin,	RootKey_Level_0
type_name=item
line_info=toc0,		sboot.bin,	RootKey_Level_0
item=toc0
bin_name=sboot.bin
key_name=RootKey_Level_0
key=/home/lxg/code/code/project/A133_android_10/longan/out/a133/common/keys/RootKey_Level_0.bin
find public key
find e key
find private key
d7 ca 26 95 ad 3a f1 ec 91 5e ec 39 f8 c2 69 24
c2 fa 69 99 91 49 8f 11 b2 58 20 95 97 fd b0 d8
7c 98 75 2a ca 37 36 75 64 31 d2 81 ae de ce c8
9d 63 c8 9b a9 5f e6 8e 0b 8e 76 50 ea f3 4b ab
2a ab 42 fd 04 29 7b 2f a5 da 50 e8 9a 9c 1b e2
80 4a 3f 2f 2a 1e 9e f4 e2 ec 78 dd 78 02 b3 2f
38 ca 34 a3 e0 a5 8d 89 3d 0d 54 d5 64 6d 9a 3f
86 38 e9 ee 04 70 75 13 8b 5c e8 3f 38 74 fb 76
22 84 cf 64 70 32 98 4d d6 79 3c 8d 18 6f 3d b4
b7 ec 6a a1 f7 36 3d 3d be e8 15 f7 9a d9 fd 6f
de 40 08 09 c4 16 a0 96 e8 12 d2 6d bc a5 63 d2
fb b1 06 45 db 2a c3 a1 96 01 29 04 8b 11 4c da
0a a1 4f 97 bc 65 0d b4 1d 3c a8 3b 7a b7 5a 95
57 a5 90 75 ed c1 83 17 ad 73 b3 70 c5 cb 60 05
6b 8e 8e f1 67 0e c0 3c 04 02 4d f2 b4 a1 bf f7
1c 2b 9d 7c 95 c3 8e dc 54 a7 95 af 48 4d e0 61
01 00 01 91 91 91 91 91 91 91 91 91 91 91 91 91
91 91 91 91 91 91 91 91 91 91 91 91 91 91 91 91
91 91 91 91 91 91 91 91 91 91 91 91 91 91 91 91
91 91 91 91 91 91 91 91 91 91 91 91 91 91 91 91
91 91 91 91 91 91 91 91 91 91 91 91 91 91 91 91
91 91 91 91 91 91 91 91 91 91 91 91 91 91 91 91
91 91 91 91 91 91 91 91 91 91 91 91 91 91 91 91
91 91 91 91 91 91 91 91 91 91 91 91 91 91 91 91
91 91 91 91 91 91 91 91 91 91 91 91 91 91 91 91
91 91 91 91 91 91 91 91 91 91 91 91 91 91 91 91
91 91 91 91 91 91 91 91 91 91 91 91 91 91 91 91
91 91 91 91 91 91 91 91 91 91 91 91 91 91 91 91
91 91 91 91 91 91 91 91 91 91 91 91 91 91 91 91
91 91 91 91 91 91 91 91 91 91 91 91 91 91 91 91
91 91 91 91 91 91 91 91 91 91 91 91 91 91 91 91
91 91 91 91 91 91 91 91 91 91 91 91 91 91 91 91

INFO: use platform[a133] toc config to create keys
生成的密钥
其中 rotpk.bin 为烧录到芯片中,用于验证根证书的公钥。Rotpk.bin 需要在烧录了安全固件的设备上才能烧录到芯片中,使用方法后述,详见 rotpk 烧写。其他为打包固件时用于为固件包签名的私钥。一个固件由多个部分组成,每个部分使用单独的密钥对进行签名认证.
这些密钥都是相互关联的,必须配套使用。生成的密钥请成套妥善保存。
out/a133/common/keys$ ls
NonTrustedFirmwareContentCertPK.bin  NOTWORLD_KEY.pem       RootKey_Level_0.bin  SCPFirmwareContentCertPK.bin  SecondaryDebugCertPK.pem        TrustedFirmwareContentCertPK.bin  TWORLD_KEY.pem
NonTrustedFirmwareContentCertPK.pem  PRIMARY_DEBUG_KEY.bin  RootKey_Level_0.pem  SCPFirmwareContentCertPK.pem  SoCFirmwareContentCert_KEY.bin  TrustedFirmwareContentCertPK.pem
NOTWORLD_KEY.bin                     PRIMARY_DEBUG_KEY.pem  rotpk.bin            SecondaryDebugCertPK.bin      SoCFirmwareContentCert_KEY.pem  TWORLD_KEY.bin
生成安全固件
pack -v
pack4dist -v
ROTPK 烧写
Rotpk 通过 PC 端工具 dragonSN 进行烧录。DragonSN 工具通过 usb 与设备通信,控制设备烧录指定的 rotpk 信息。具体烧录步骤如下:
- 配置 burn_key 属性: sys_config.fex 设置 burn_key 属性值为 1 后,设备才会接收 DragonSN 通过 usb 传输的信息,进行相应的烧录工作
- 打包安全固件并烧录,打包时使用的密钥必须与烧录的 rotpk 匹配
- 在 PC 端配置 DrangonSN 工具后运行
- 设备通过 usb 与 pc 连接后开机
- DrangonSN 显示设备已连接后开始烧录
注意事项
为了保证不会误烧错误的 rotpk,烧录时小机端会做额外的处理,具体流程如下:pc 工具下发的rotpk,uboot 会在确认与当前固件的 rotpk 匹配后才请求 secure os 烧录该 rotpk
- rotpk 只能烧录一次,烧录后不可再修改
- 烧录过安全固件后,芯片每次上电都会对固件进行安全性检查,这时候烧录普通固件,会因为无法通过检查而不能启动。故安全固件和普通固件不可混合使用
- 芯片未烧录 rotpk 时,跳过根证书上公钥的验证,继续进行
- 芯片出厂时,芯片内记录的防回滚版本号为 0